

Performing In-Place Upgrade for Windows Server on Google Cloud: A Comprehensive Guide
Upgrading your Windows Server on Google Cloud Platform (GCP) is a critical task to ensure you benefit from the latest features and security updates. In this blog post, we will walk you through the detailed steps outlined in the Google Cloud documentation for performing an in-place upgrade for Windows Server.
Step 1: Take a Clone of the Server Before the OS Update
Before initiating any upgrade process, it is essential to create a clone of your server. This serves as a backup, allowing you to revert to the previous state in case of any unforeseen issues during the upgrade.
Step 2: Update the Server and Check for Updates
Before proceeding with the upgrade, make sure to update the server and check for any pending updates. This ensures that your system is in the best possible state before the upgrade process.
(Run all below command gcloud cli)
Step 3: Create a Disk Based on Installation Media
a) Set the GCP project :-
Command:-
gcloud config set project PROJECT_ID
b) Create a disk based on the installation media: –
Command:-
gcloud compute disks create win-installers
–image-family=windows-install-media
–image-project=compute-image-tools –zone=ZONE-Name
c) Attach the disk to your VM in read-only mode:-
Command:-
gcloud compute instances attach-disk VM_NAME –disk=win-installers –mode=ro –zone=ZONE
gcloud compute instances attach-disk VM_NAME –disk=win-installers –mode=ro –zone=ZONE-Name
Step 4: Attach Custom Installation Media as Additional Disk
Follow the steps in Creating an image from an ISO file to create a disk from the ISO image for custom installation media.
Step 5: Prepare the ISO File (Run All this command using gcloud cli +)
a) Set the ISO file URL:
Command:-
ISO_URL=https://example.com/big.iso
b) Create a disk containing the contents of the ISO file
Command:-
DISK_NAME=iso
Create a new disk to which to copy the contents of the ISO files:
gcloud compute disks create $DISK_NAME \
–size=10GB \
–zone=$(gcloud config get-value compute/zone)
Note:- Use a larger disk size if your ISO file exceeds 9 GB.
c) Create a startup script for the temporary VM. The startup script performs the following actions:
1) Format the secondary disk with the NTFS file system.
2) Download the ISO file from the HTTP or Cloud Storage URL you specified.
3) Mount the ISO file and copy its contents to the secondary disk.
Note: Execute the script as-is on the command-line interface (CLI) by obtaining the script from the URL mentioned above.
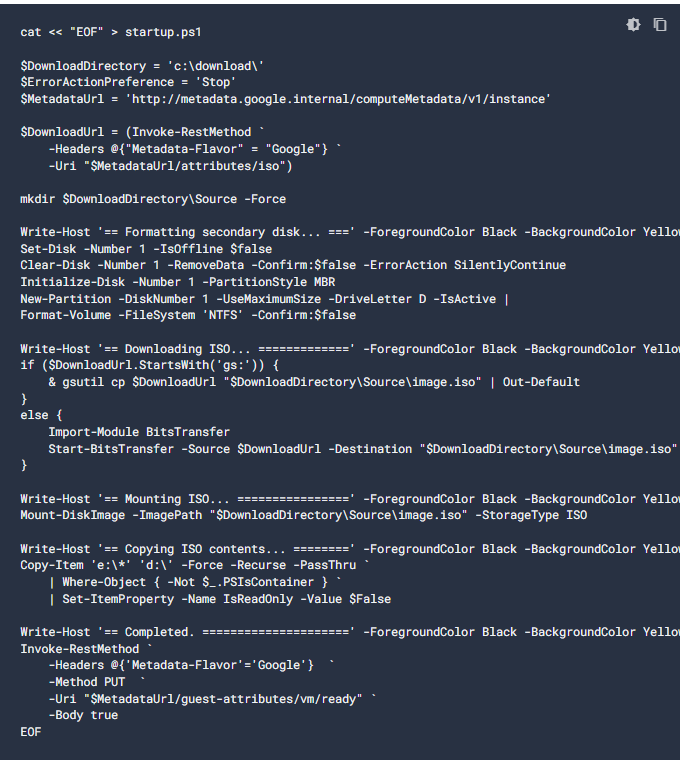
d) Create a Windows Server 2019 VM using the startup script and the created disk:
Command:-
gcloud compute instances create iso-copier \
–machine-type=n1-standard-2 \
–image-family=windows-2019-core \
–image-project=windows-cloud \
–disk=name=$DISK_NAME,auto-delete=no \
–metadata=enable-guest-attributes=true,iso=$ISO_URL \
–metadata-from-file=windows-startup-script-ps1=startup.ps1 \
–scopes=https://www.googleapis.com/auth/devstorage.read_only
The VM takes about 2 minutes to start. Depending on the size of the ISO file, it can take another 5-15 minutes for the file copy operation to complete. You can observe the progress by running the following command:
e) Monitor the progress of the VM and file copy operation:
Command:-
gcloud compute instances tail-serial-port-output iso-copier \
–zone=$(gcloud config get-value compute/zone)
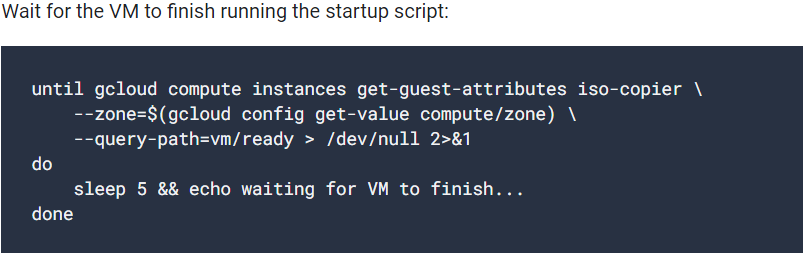
f) Wait for the VM to finish running the startup script:
g) Shut down and delete the temporary VM:
Command:-
gcloud compute instances delete iso-copier \
–zone=$(gcloud config get-value compute/zone) \
–quiet
h) Create an image from the disk:
Command:-
gcloud compute images create $DISK_NAME \
–source-disk=$DISK_NAME \
–source-disk-zone=$(gcloud config get-value compute/zone)
Step 6: Attach the Disk to Your VM in Read-Only Mode
Command:-
gcloud compute instances attach-disk VM_NAME –disk=CUSTOM_MEDIA_DISK –mode=ro –zone=ZONE
Step 7: Start the Upgrade VM
Take an RDP connection to the server with the attached extra volume. Ensure that you have two disks: one for the ISO file and another for Windows Server update files.
Step 8: Select the Version and Start the Update
Navigate to the Windows Server version you want to update to, click on the version, open the folder, and start the update. Accept the terms and conditions, choose to keep files as-is, and proceed with the update.
Step 9: Monitor the Update Process
The update process may take over 1.5 hours. Monitor the serial port log for progress. After this period, the VM may temporarily lose connection, but check the serial port log to confirm that the update is in progress.
Conclusion:
By following these comprehensive steps, you can successfully perform an in-place upgrade for Windows Server on the Google Cloud Platform. Keep track of the progress, be patient during the update process, and ensure you have backups in place to mitigate any potential issues.